Push notifications to iOS & Android devices
Send a message directly to your users’ iOS or Android devices even if the application is not open. You can also automatically redirect to a screen within the application.
A true marketing tool, it allows you to retain your users and maintain their engagement over time. Learn how to send and configure your push notifications.
Configure push notifications
To send push notifications, your application must be published on the App Store or Google Play. Discover the settings to configure based on each platform:
On ios
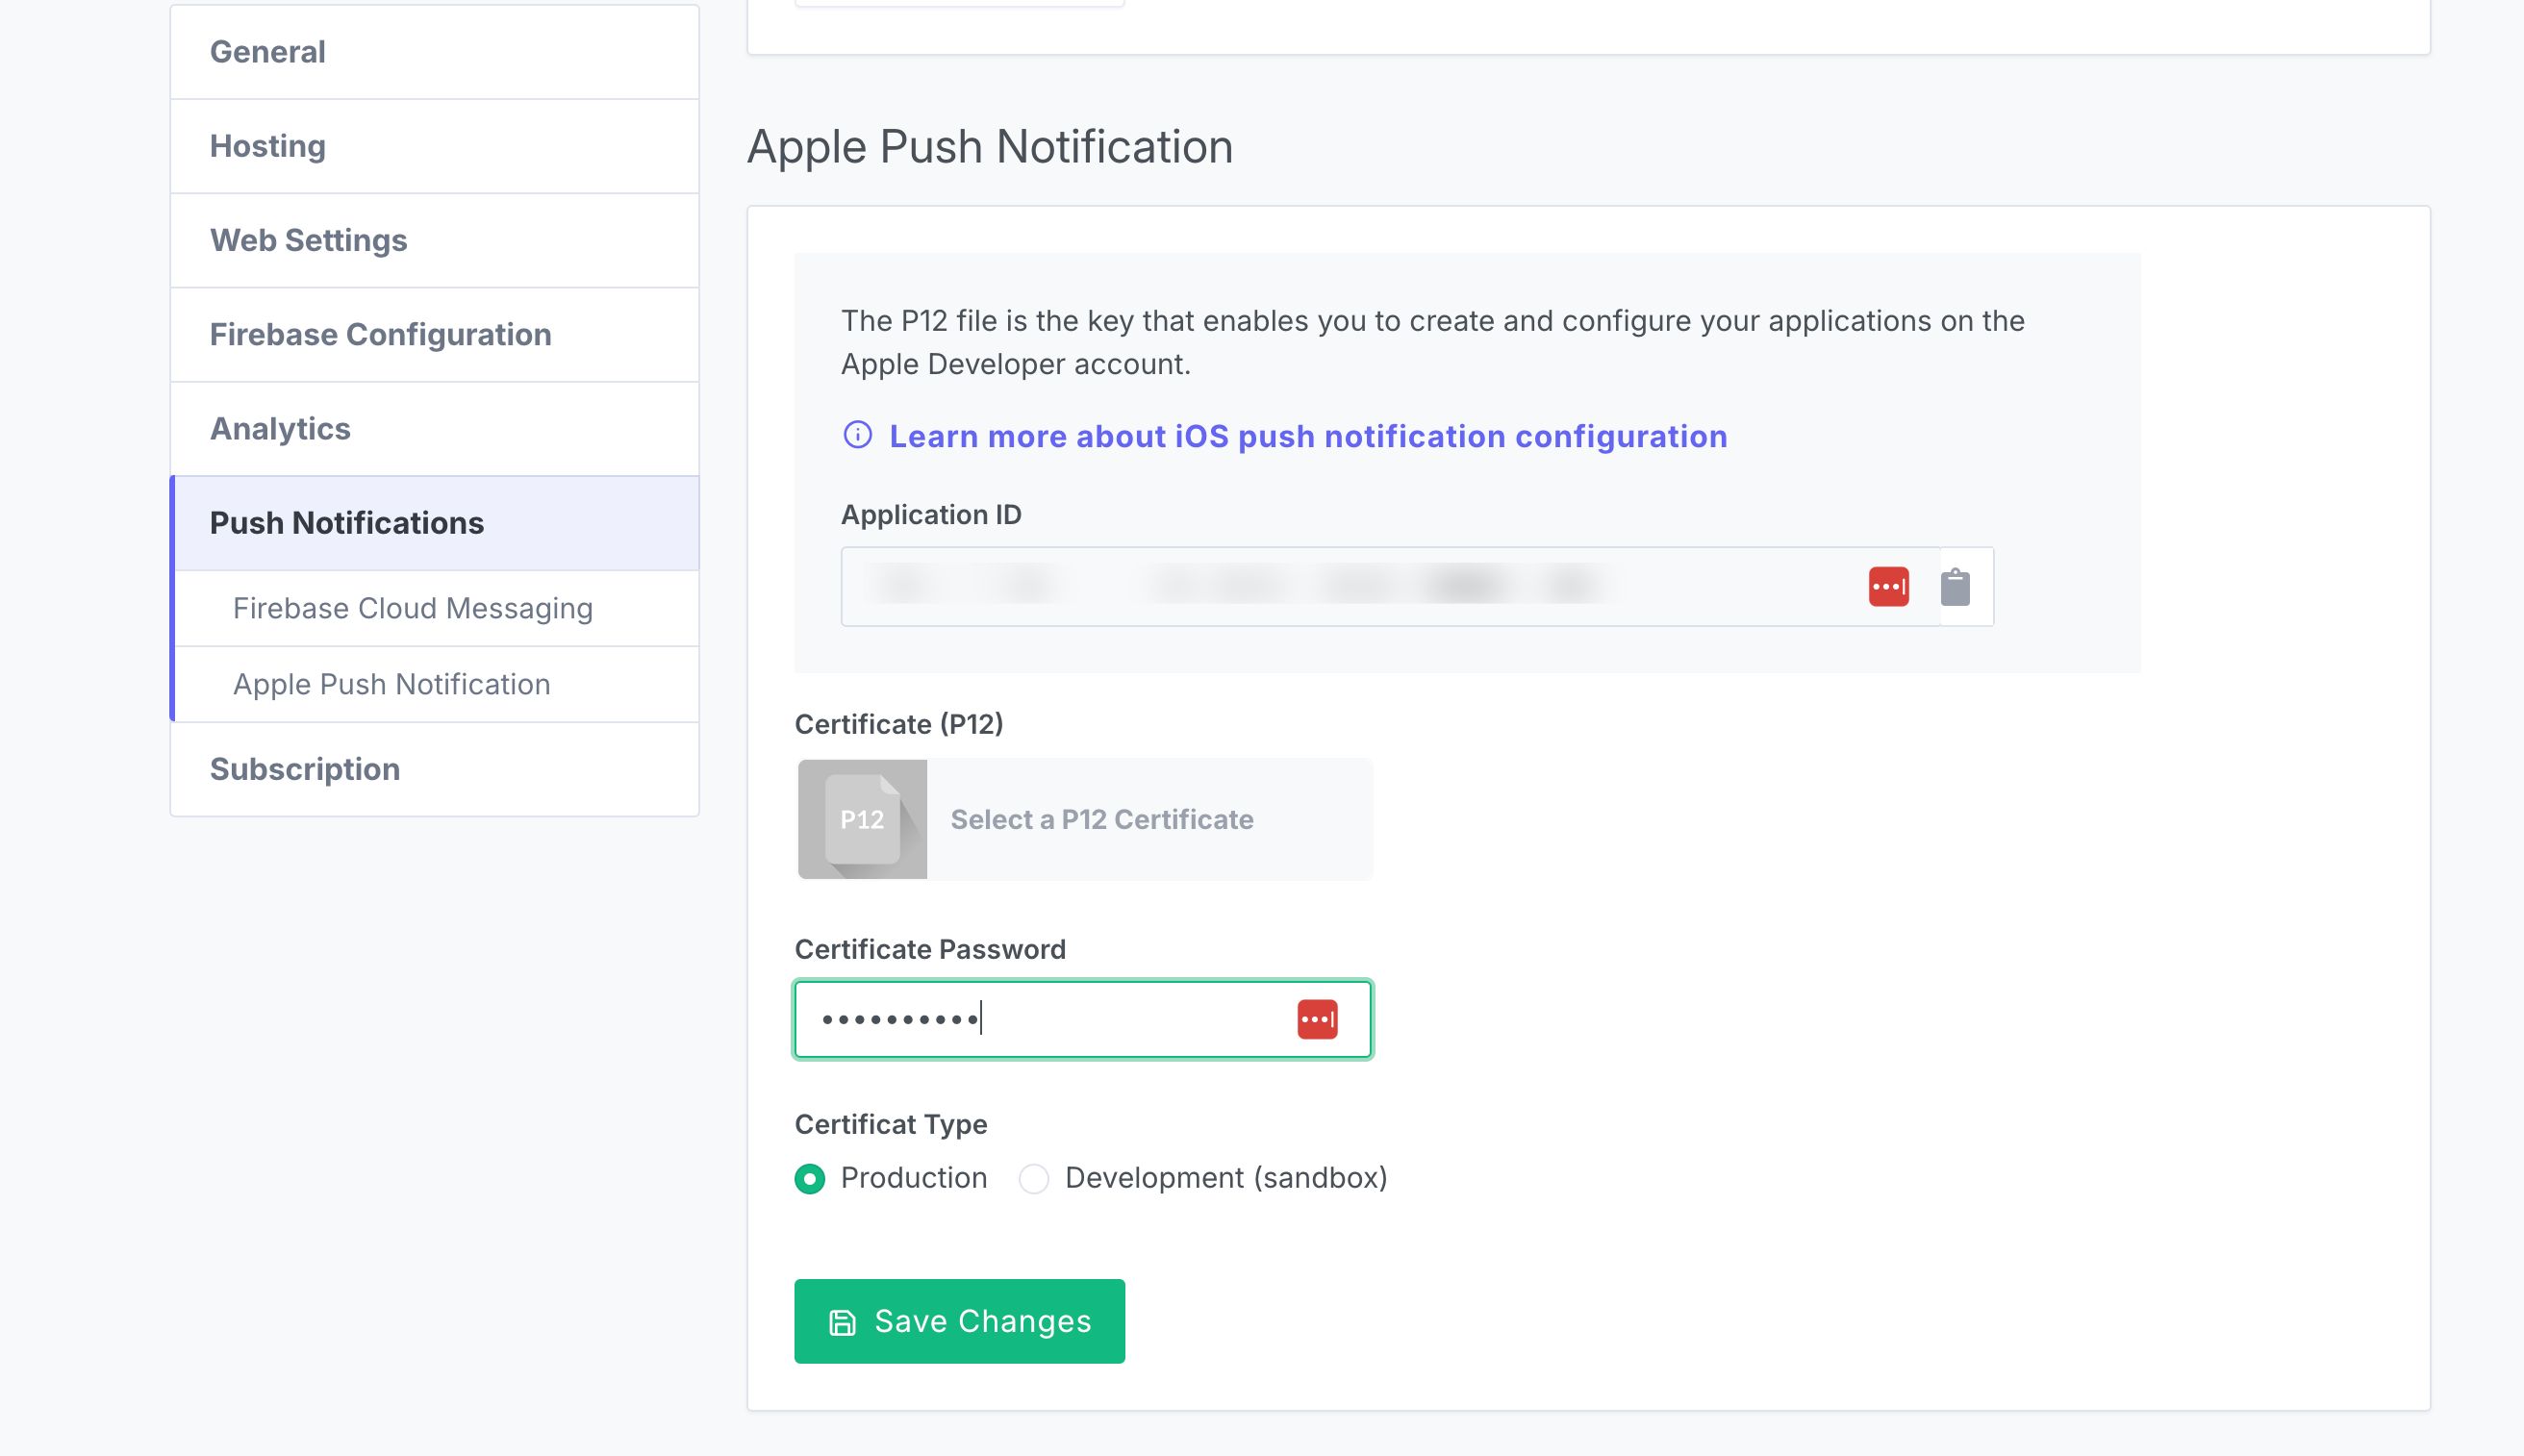
It is necessary to create a specific iOS certificate to enable push notifications. Learn more: Create an iOS Certificate.
Next, simply upload this certificate and insert the password in the dedicated section of your dashboard ( Settings > Push Notifications > Apple Push Notifications).
On android
It is necessary to associate a Firebase Cloud Messaging account with your Firebase project. Here is the tutorial to follow: Configure Push Notifications on Android.
If you encounter any issues configuring this service, feel free to contact the team! 😊
Send a push notification
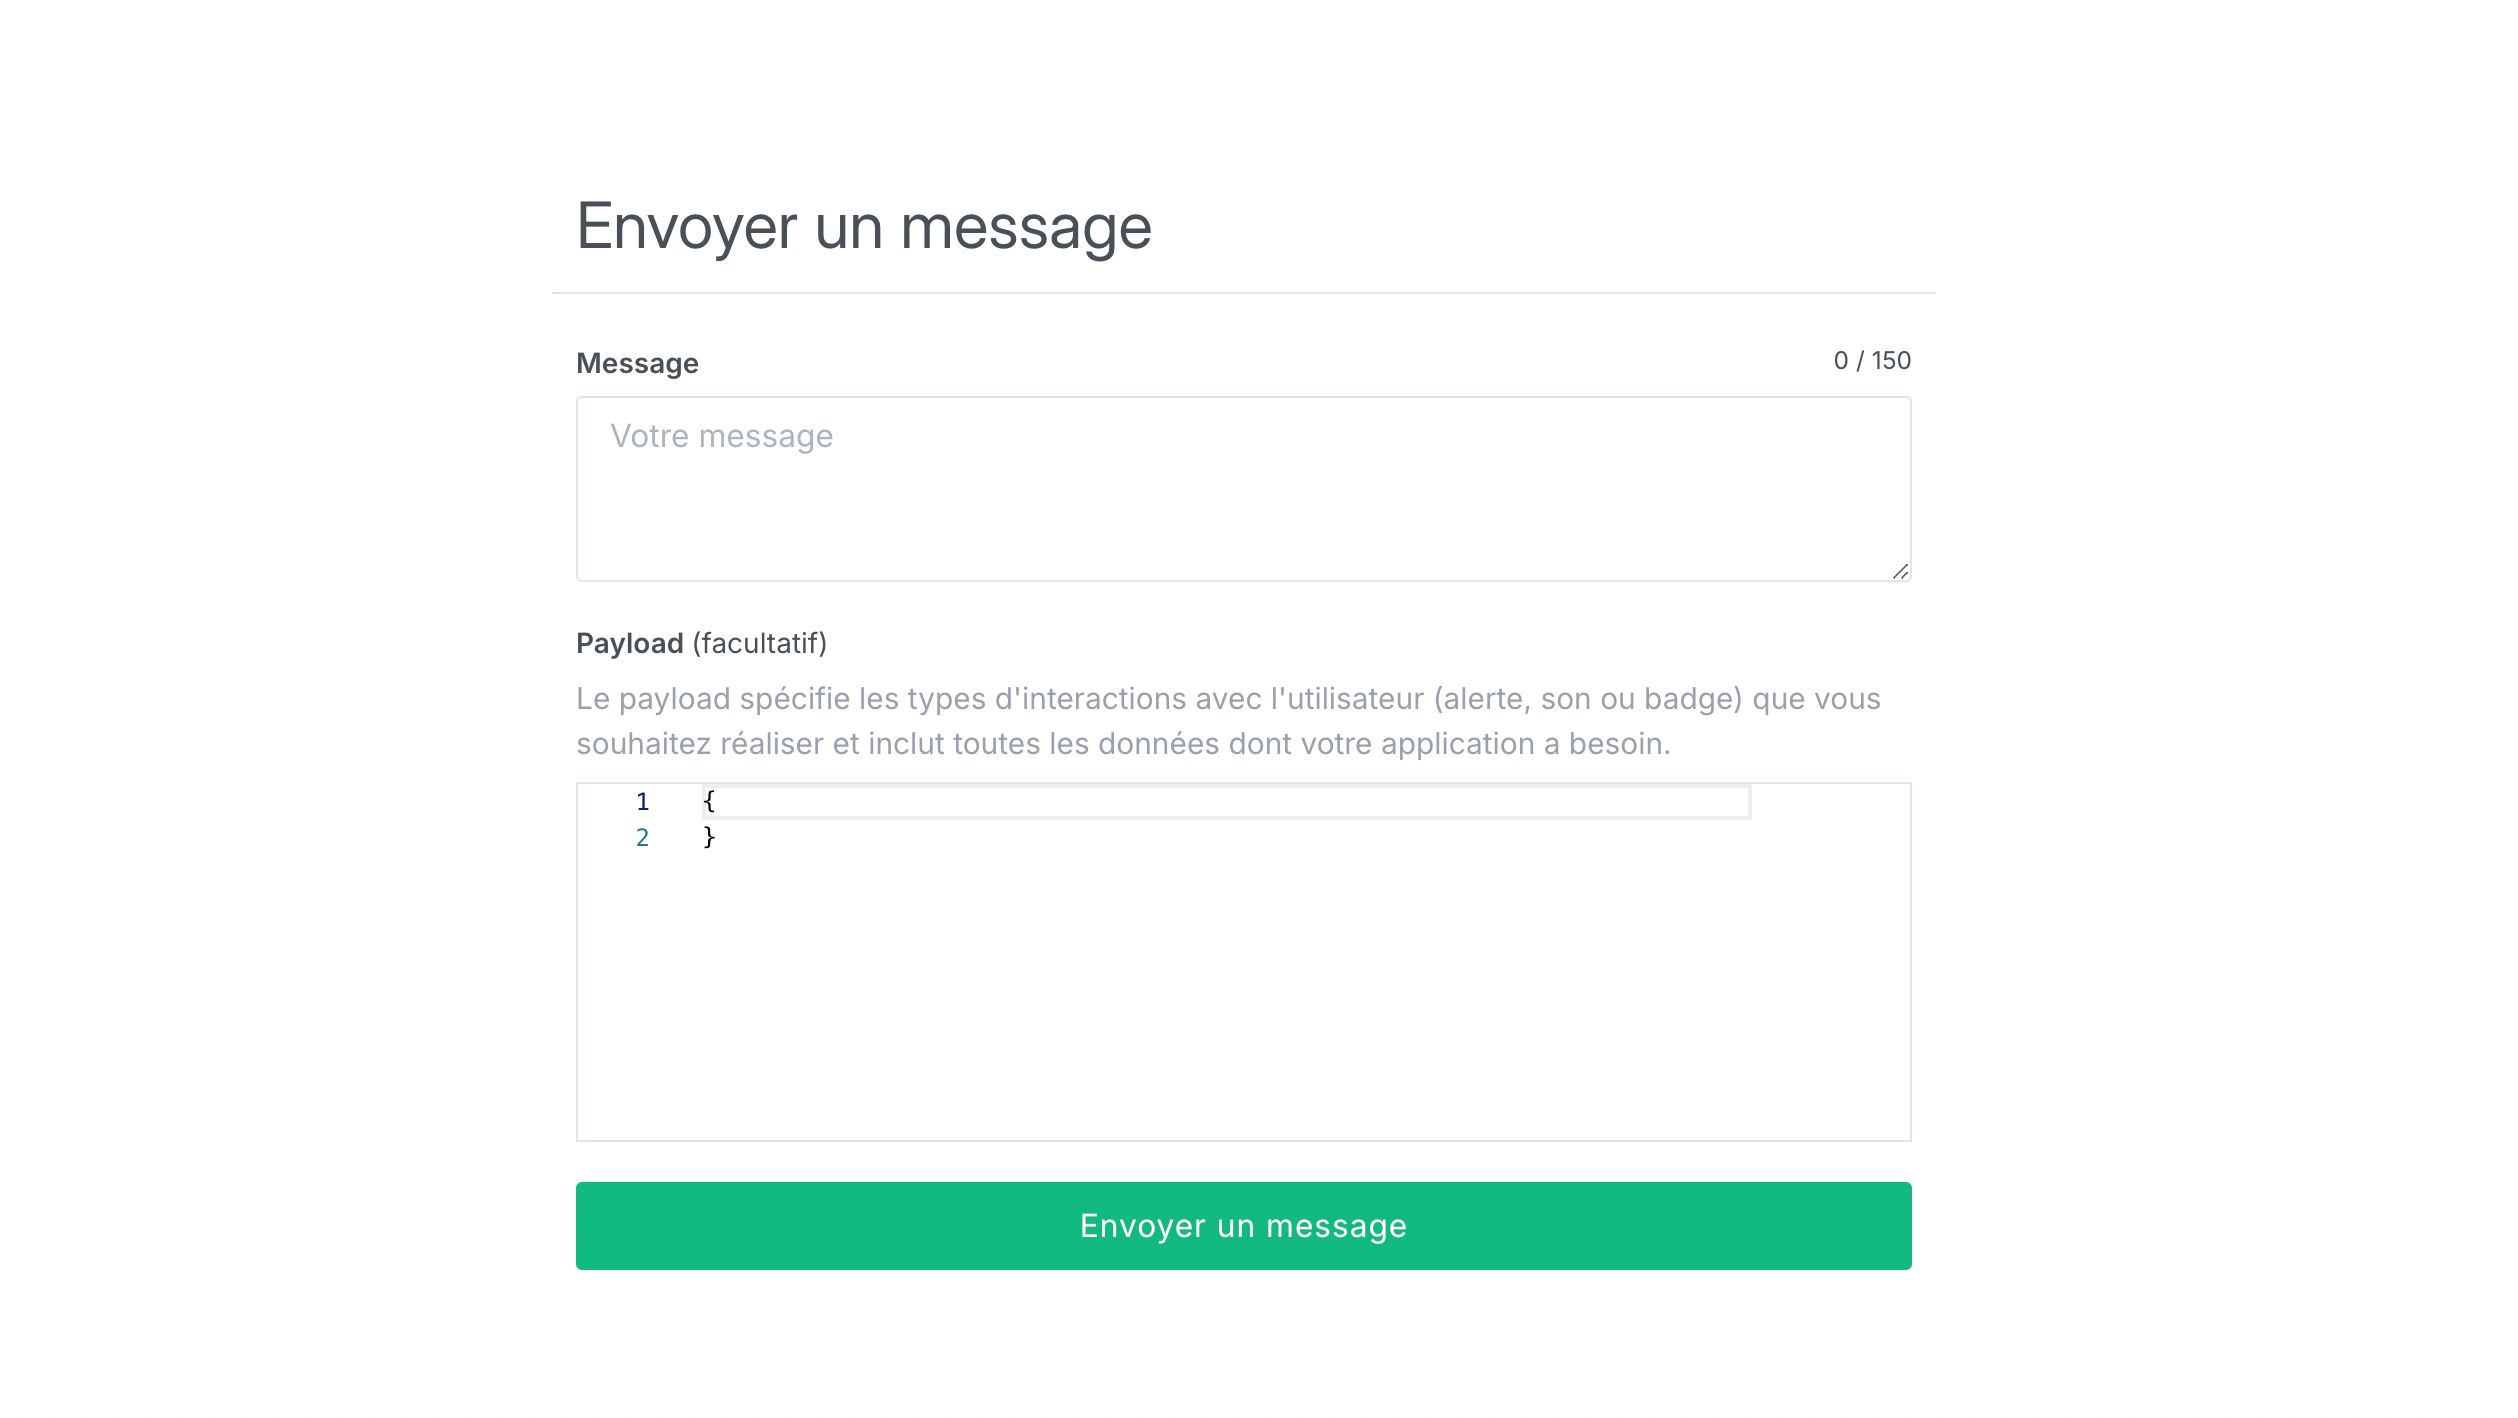
To send a push notification, go to your dashboard in the Apps tab:
- Select your application
- Go to the Services > Push Notifications section
- Click on the Send Message button
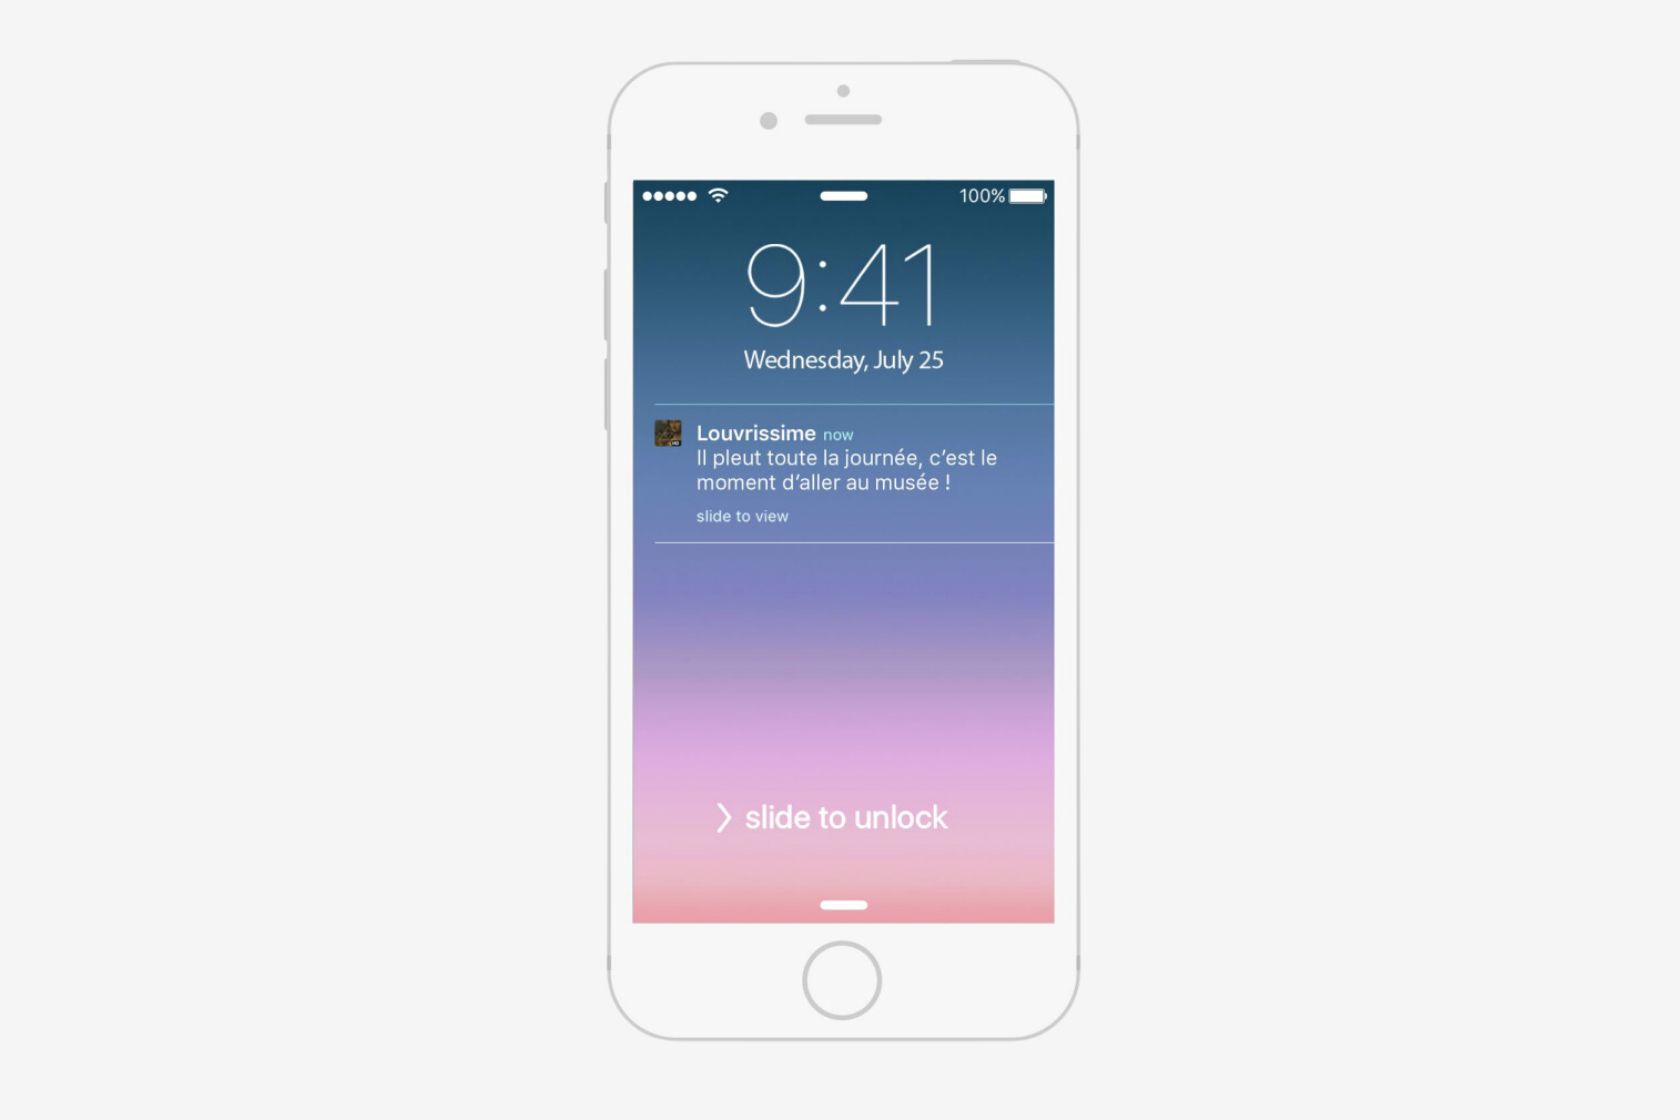
- Type your message in the field: it should be short and impactful, the limit is 150 characters.
For now, it is not possible to target recipients or schedule the time and sending of the message: the message is sent automatically to all your users. New features will be added to this service soon.
If your users have agreed to receive notifications when they installed your application, they will receive your message on their phone or smartphone.
Redirect to a screen
You can ensure that the user is automatically redirected to a screen after clicking on the notification.
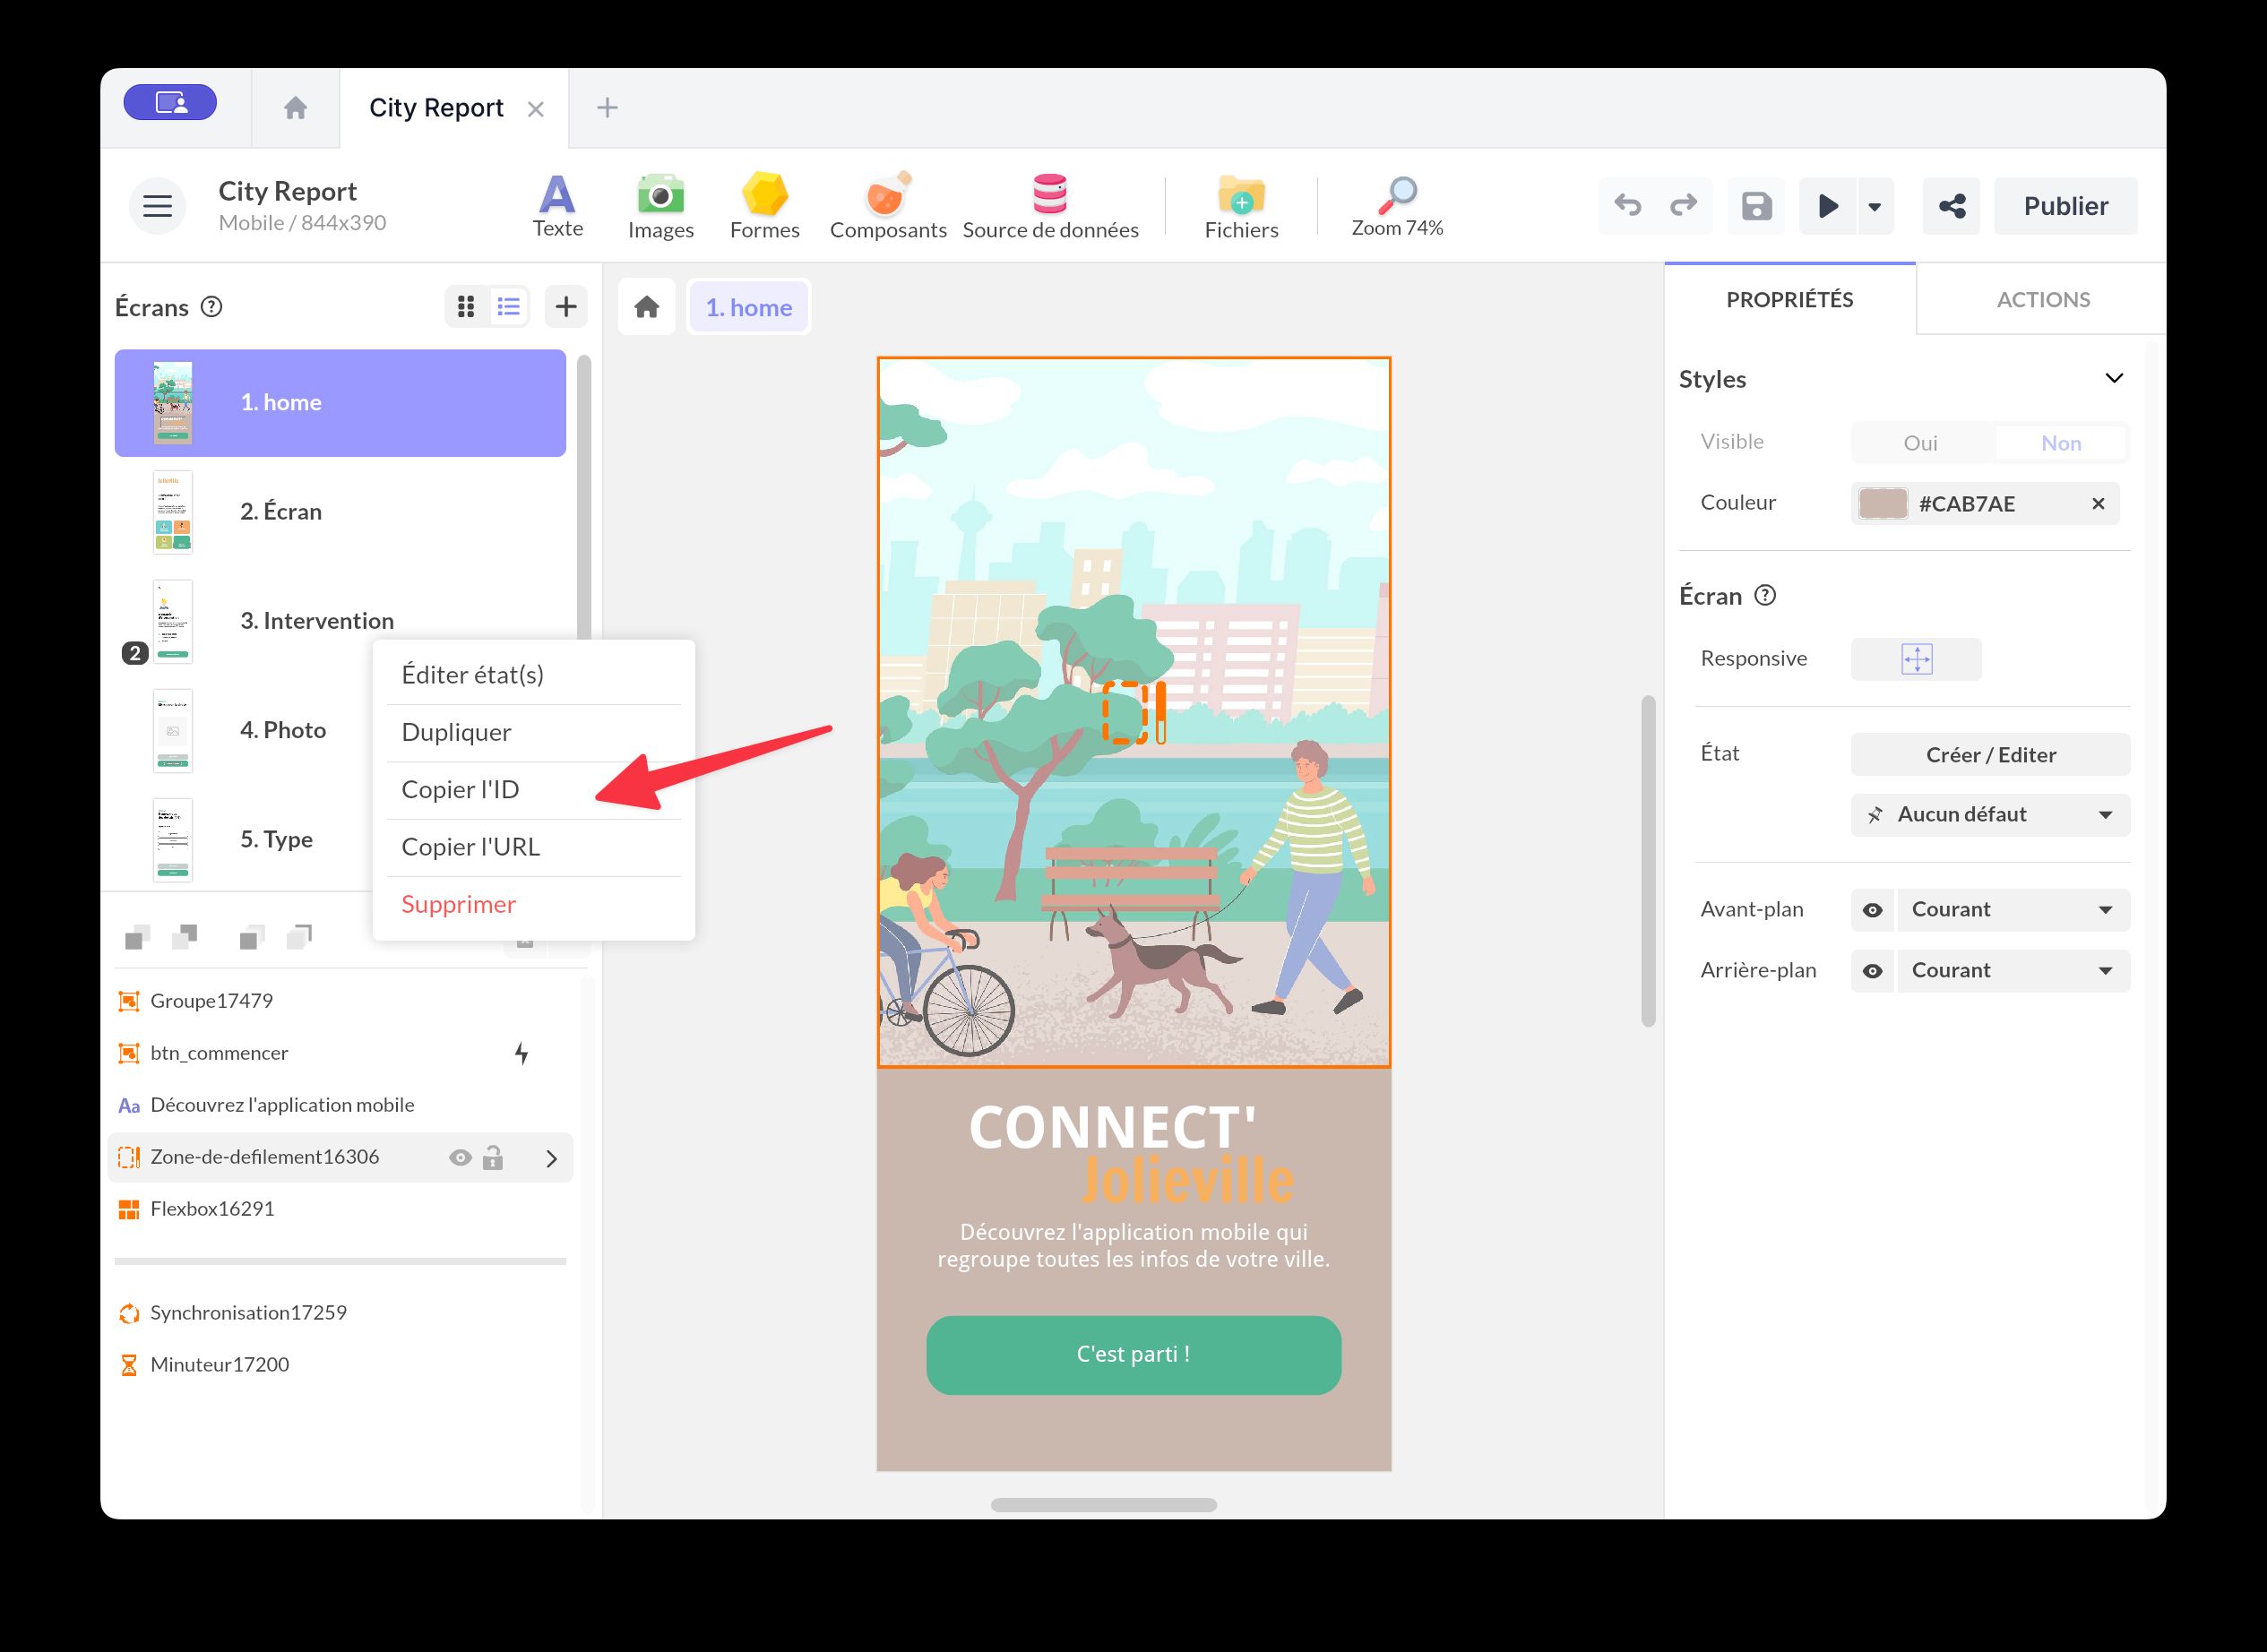
To do this, when writing the message, add a parameter in the Payload field.
Indicate "wid" = "id" where id is the identifier of your screen. To obtain the identifier of your screen, go to PandaSuite Studio. Select your screen and click on the dropdown menu.
Use push notification data in your project
When a push notification is received, PandaSuite updates the Push Notification (data) project data and triggers the Push Notification Received project trigger. You can then use this information in your bindings, conditions, and actions.
In PandaSuite Studio:
- Select Project
- Open the Properties panel
- Add a Push Notification Received trigger
- Use the Push Notification (data) branch in the Data binding panel
The exposed structure is:
Project > Push Notification (data) > titleProject > Push Notification (data) > messageProject > Push Notification (data) > soundProject > Push Notification (data) > Data > ...
The Data branch contains the custom keys sent in the push payload. For example, if your push contains campaign, discount, or wid, you can read these values from Project > Push Notification (data) > Data.
Example:
{ "wid": "page_promo", "campaign": "summer2026", "discount": "20"}You can then:
- Display a promotional message adapted to
campaign - Show a special offer based on
discount - Trigger an action when Push Notification Received occurs
Use title, message, and sound for the notification metadata, and data for your custom keys.
Automate push notifications with your backend (Web App)
If your native app embeds a Web App (for example with the Web component), you can send real push notifications triggered by your own backend. The native shell retrieves the device token and exposes it to your Web App via PandaBridge.
For projects built directly in PandaSuite Studio, the same token is also available through data binding at Project > Context > Viewer > deviceToken. Use this path when you want to send the current device token to an API from a standard PandaSuite action or component. See Project information for the full project data tree.
Prerequisites
- Complete the platform setup above (iOS certificate/APNs and Android Firebase/FCM).
- Ensure your Web content loads PandaBridge.
Add the PandaBridge script and capture the device token on load:
<script src="https://cdn.jsdelivr.net/npm/pandasuite-bridge/lib/pandasuite-bridge.min.js"></script><script> // Runs inside your Web App (embedded page) PandaBridge.init(() => { PandaBridge.onLoad((properties) => { const deviceToken = properties && properties.__ps_device_token; if (deviceToken) { // Associate this token with the signed-in user in your backend saveTokenForCurrentUser(deviceToken); } else { // Token not available yet (permission denied or first launch) // Optionally retry later in the session } }); });</script>Once stored server-side, you control automated business rules (e.g., X days after an event) and send push notifications using the platform services:
- Android: Firebase Cloud Messaging (FCM) using the device token
- iOS: Apple Push Notification service (APNs) using the device token
To deep-link to a specific screen from your own server, include the same payload parameter described above:
- APNs example:
{ "aps": { "alert": "Your message" }, "wid": "your-screen-id"}- FCM example:
{ "notification": { "body": "Your message" }, "data": { "wid": "your-screen-id" }}The device token may be missing if the user declined notifications or on the very first launch. Plan for retries (for example, refresh the token at sign-in) and avoid assuming it is always present.
The __ps_device_token property is available only in native iOS/Android builds. It is not present in web-only projects.